Intro to Robot Code
Setup
In order to write and run robot code, we will need to install a few pieces of software.
WPILib
The WPILib suite installs the IDE we write our code in as well as the tools needed to run and deploy that code to the robot.
Follow the instructions on the official WPILib documentation for your respective OS. This will install WPILib and all its required tooling, as well as the VSCode IDE that we use to write code.
Git and Github
We use Git and Github to keep track of and collaborate on code.
Follow the instructions for your respective OS to download Git.
If you do not have a Github account, create one now.
Once you have your account, tell a programming mentor or programming lead your username so they may add you to our GitHub organization.
Next, set up your username (your real name) and email in Git by following these instructions:
Creating a robot project
With VSCode
Bring up the Visual Studio Code command palette with Ctrl+Shift+P:

Then, type “WPILib” into the prompt. Since all WPILib commands start with “WPILib,” this will bring up the list of WPILib-specific VS Code commands:

Now, select the “Create a new project” command:

This will bring up the “New Project Creator Window:”
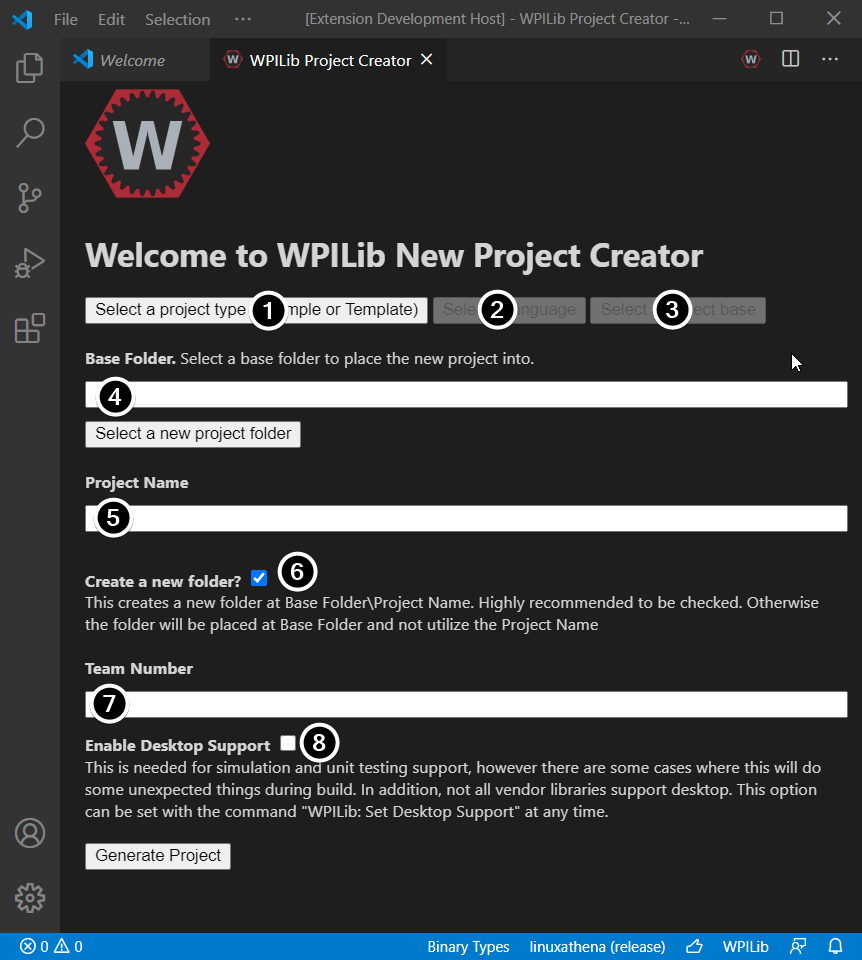
Some elements we care about are explained below:
- Project Type: The kind of project we wish to create. Usually we want
template. - Language: The language (C++ or Java) that will be used for this project. We will be using Java.
- Project Base: The base class or example to generate the project from. Our team uses
Command Robot. You can find the templates here and examples here. - Project Location: This determines the folder in which the robot project will be located.
- Create New Folder: If this is checked, a new folder will be created to hold the project within the previously-specified folder. If it is not checked, the project will be located directly in the previously-specified folder. An error will be thrown if the folder is not empty and this is not checked. You almost always want this to be checked.
- Project Name: The name of the robot project. This also specifies the name that the project folder will be given if the Create New Folder box is checked. Our code for each year is named with the format
Code<year>ie:Code2020. - Team Number: The team number for the project, which will be used for package names within the project and to locate the robot when deploying code. Our team number is
253.
Once all the above have been configured, click “Generate Project” and the robot project will be created.
Opening The New Project
After successfully creating your project, VS Code will give the option of opening the project as shown below. We can choose to do that now or later by typing Ctrl+K then Ctrl+O (or just Cmd+O on macOS) and select the folder where we saved our project.
Once opened, we will see the project hierarchy on the left. Double-clicking on a file will open that file in the editor.
Project Structure
A typical robot project may look like this:
Code2020/
├── build.gradle
├── gradle/
├── gradlew
├── gradlew.bat
├── settings.gradle
├── src/main/java/frc/robot/
│   ├── Constants.java
│   ├── Main.java
│   ├── Robot.java
│   ├── RobotContainer.java
│   ├── commands/
│   │   ├── ConveyorQueue.java
│   │   ├── Drive.java
│   │   ├── Shoot.java
│   │   └── VisionTrack.java
│   └── subsystems/
│       ├── Arm.java
│       ├── Climber.java
│       ├── Conveyor.java
│       ├── Drivetrain.java
│       ├── Intake.java
│       └── Shooter.java
└── vendordeps/
    ├── Phoenix.json
    ├── REVColorSensorV3.json
    ├── REVRobotics.json
    ├── WPILibNewCommands.json
    ├── WPILibOldCommands.json
    └── navx_frc.json
It's a lot, so let's break it down. This is an intro to our robot structure, so we won't go into specifics on how to actually write the code until the next section.
Gradle
When creating a robot project, Gradle will automatically generate the files build.gradle, gradle/, gradlew, gradlew.bat, settings.gradle. You shouldn't ever need to touch these.
Your IDE may also generate the folders bin/, build/, .wpilib/, .vscode/, and .idea/. It's safe to ignore these files as well.
vendordeps
The vendordeps/ folder in our robot code contains .json files that identify third party libraries we use.
You can read more about it here.
src
Just like any other Java project, the src/ directory holds all of our actual code.
src/main/java/frc/robot/
├── Constants.java
├── Main.java
├── Robot.java
├── RobotContainer.java
├── commands/
│   ├── ConveyorQueue.java
│   ├── Drive.java
│   ├── Shoot.java
│   └── VisionTrack.java
└── subsystems/
    ├── Arm.java
    ├── Climber.java
    ├── Conveyor.java
    ├── Drivetrain.java
    ├── Intake.java
    └── Shooter.java
Main.java
This file is autogenerated, and there is rarely any reason to touch this file at all.
It contains the classic main method, which is run at startup and starts up the rest of the robot code.
Robot.java
This file is the control center of the robot. It has the methods that are called to run the robot. Documentation on each of the methods within it can be found here.
Constants.java
This file contains all the numbers that don't change and are relevant to the whole robot. This includes all ports and joystick buttons, which correlate to motor controllers, solenoids, and commands in the code.
RobotContainer.java
This is where we create and store the objects for the subsystems, and set up all the controller and joystick commands that the driver uses to operate the robot.
It does not extend from any superclasses, and is mainly used as a way to separate code from Robot.java
commands/
Commands are what run the robot. For example, there may be a RunIntake command that runs two motors to turn the wheels that intake a game piece.
subsystems/
Subsystems are another name for robot mechanisms, such as a drivetrain, a shooter, an intake, or a climber. The subsystem classes contain the Objects for the motor controllers and solenoids and have methods for controlling the subsystem, which are used by commands.
Deploying code to the robot
Note
Deploying code to the RoboRIO only works on a Windows computer; however, you can still build your code to see if it compiles correctly.
Now that you've created a robot project, you may want to deploy your code to the robot. In order to do this you'll need a few things:
- A Windows computer with the driver station software installed
- A RoboRIO connected to an electronics board (radio optional) and a battery
- If you do not have the radio, have a USB-B cable handy to connect your computer to the RIO
With the radio: Disconnect from your wifi network and connect to the radio's wifi network.
Without the radio: Plug the computer into the RoboRIO using a USB-B cable.
Now that you're connected, it's time to actually deploy your code. Follow the WPILib instructions to deploy your code to the robot.
Writing robot code
Now you know how to deploy your code. Let's learn how to interact with physical components of the robot.
Javadocs
Java has a standard documentation format that is autogenerated from documentation comments in the code. We will be referencing them extensively to write our code.
On top of a Javadoc contains a description of the class, its package, what it inherits, and more. Below that is a section containing the class' constructors, and the section below contains the methods you can call from that class. If you click on any of the constructors or methods, you get directed to a section with more details about what you clicked. Here's a Javadoc of a class you should be familiar with: ArrayList.
WPILib
WPILib is the name of the library FRC provides us to control the robot with.
Its JavaDocs are located here (and you can also find a link to them in the Resources page of this site).
We will be mostly using the library's edu.wpi.first.wpilibj package, and you can search for a class or method using the search bar located in the top right corner of the javadocs page.
Practice
First has a pretty good write-up on command-based programming, so we'll read that. Once you're done, we'll practice writing some basic commands.
Before you start
If you have access to a robot and would like to test your code, you will need the following items:
- items from the previous section
- an Xbox controller
- a Talon SRX
- a brushless motor
Ask your teammates in the electronics department for help :)
If you are new to git, read the intro to git section before proceeding.
Clone the TrainingRobot project, and open it in VSCode. You can check if you have got the right project open by deploying the project to the robot and pressing the X button on the controller. If the motor spins, you've got the right code!
Note
VSCode may prompt you to "import project to 2020". Don't do this.
Warning
Please don't actually push any of your changes to the Github repository.
Part 1: Basic IO
Let's change the button to trigger the command continuously while it's held rather than when it's pressed.
In the TrainingRobot project, find the RobotContainer.java file (src/main/java/frc/robot/RobotContainer.java).
Currently, line 51 contains the method whenPressed(). Refer to the WPILib Javadocs to determine what you need to change whenPressed() to in order to run the command while the button is pressed.
Hint
controller_X is an instance of the JoystickButton class.
In the same project, you'll find the RunMotor.java file in the commands/ directory.
In the RunMotor class, the end() method is currently empty. Add code to it that stops the motors.
Hint
You might want to write something similar to what's in execute().
Once you think you figured it out, follow the above Deploying robot code section again to deploy, and see if your code worked!
Solutions
private void bindIO() {
    controller_X.whileHeld(new RunMotor(motors));
}
@Override
public void end(boolean interrupted) {
    motors.run(0);
}
Part 2: Default commands
Right now, our motor only has two states: half power, or completely off. Let's make the motor's speed correspond to more granular controller input using a joystick.
Again in the RobotContainer.java file, modify the bindIO() method to set the default command of the Motors subsystem to the RunMotors command.
Hint
Get the joystick's Y-value from the XboxController we already have defined.
Hint
Motors is an implementation of the Subsystem interface.
Pass the Motors subsystem into the command and have it drive the motors to the Y-value of the joystick when executed. Use the prewritten code, the command-based programming tutorial, and the WPILib JavaDocs for help.
Example Solution
This is one way to implement this step. Yours may look a little different, but the same logic should appear here.
import edu.wpi.first.wpilibj.GenericHID;

private void bindIO() {
    motors.setDefaultCommand(new RunMotor(motors));
}

public static double getMotorSpeed() {
    // the vertical axis of the left joystick of the XboxController
    return controller.getLeftY();
}
import frc.robot.RobotContainer;

@Override
public void execute() {
    motors.run(RobotContainer.getMotorSpeed());
}
Again, deploy your code to the robot to see if it worked! Once you're satisfied with your changes, read the Git Flow page to push your changes.